Thursday 28 February 2013

Recipe organization


For years my recipe organization has been a disaster. Printed pages from various websites and random recipes written on pads of paper (provided by local solicitors), both in different areas of the house. Unfortunately, I didn't know where anything was and would get very discouraged trying to find a recipe. The result? I didn't use my recipes very often.

I searched for different solutions through Google images and I decided to go with something familiar to me. I work in an office by day, so an expandable file folder seemed to make the most sense. Organizing papers is part of my job, I figured I should live how I work.

I picked up the expandable, see through file folder at Superstore for $4. Depending on how many recipes one has, you may need to get a bigger file. I recently organized my moms recipes, using the same file, and it was a little snug for them all. Depending on how many she accumulates, she may need to upgrade in size in the next few years. I had some of her really old recipes laminated, it was nostalgic to go through beautifully hand written recipes from both my grandmothers.

I have Happy Herbivore's replacing fats in baking PDF in the front. 

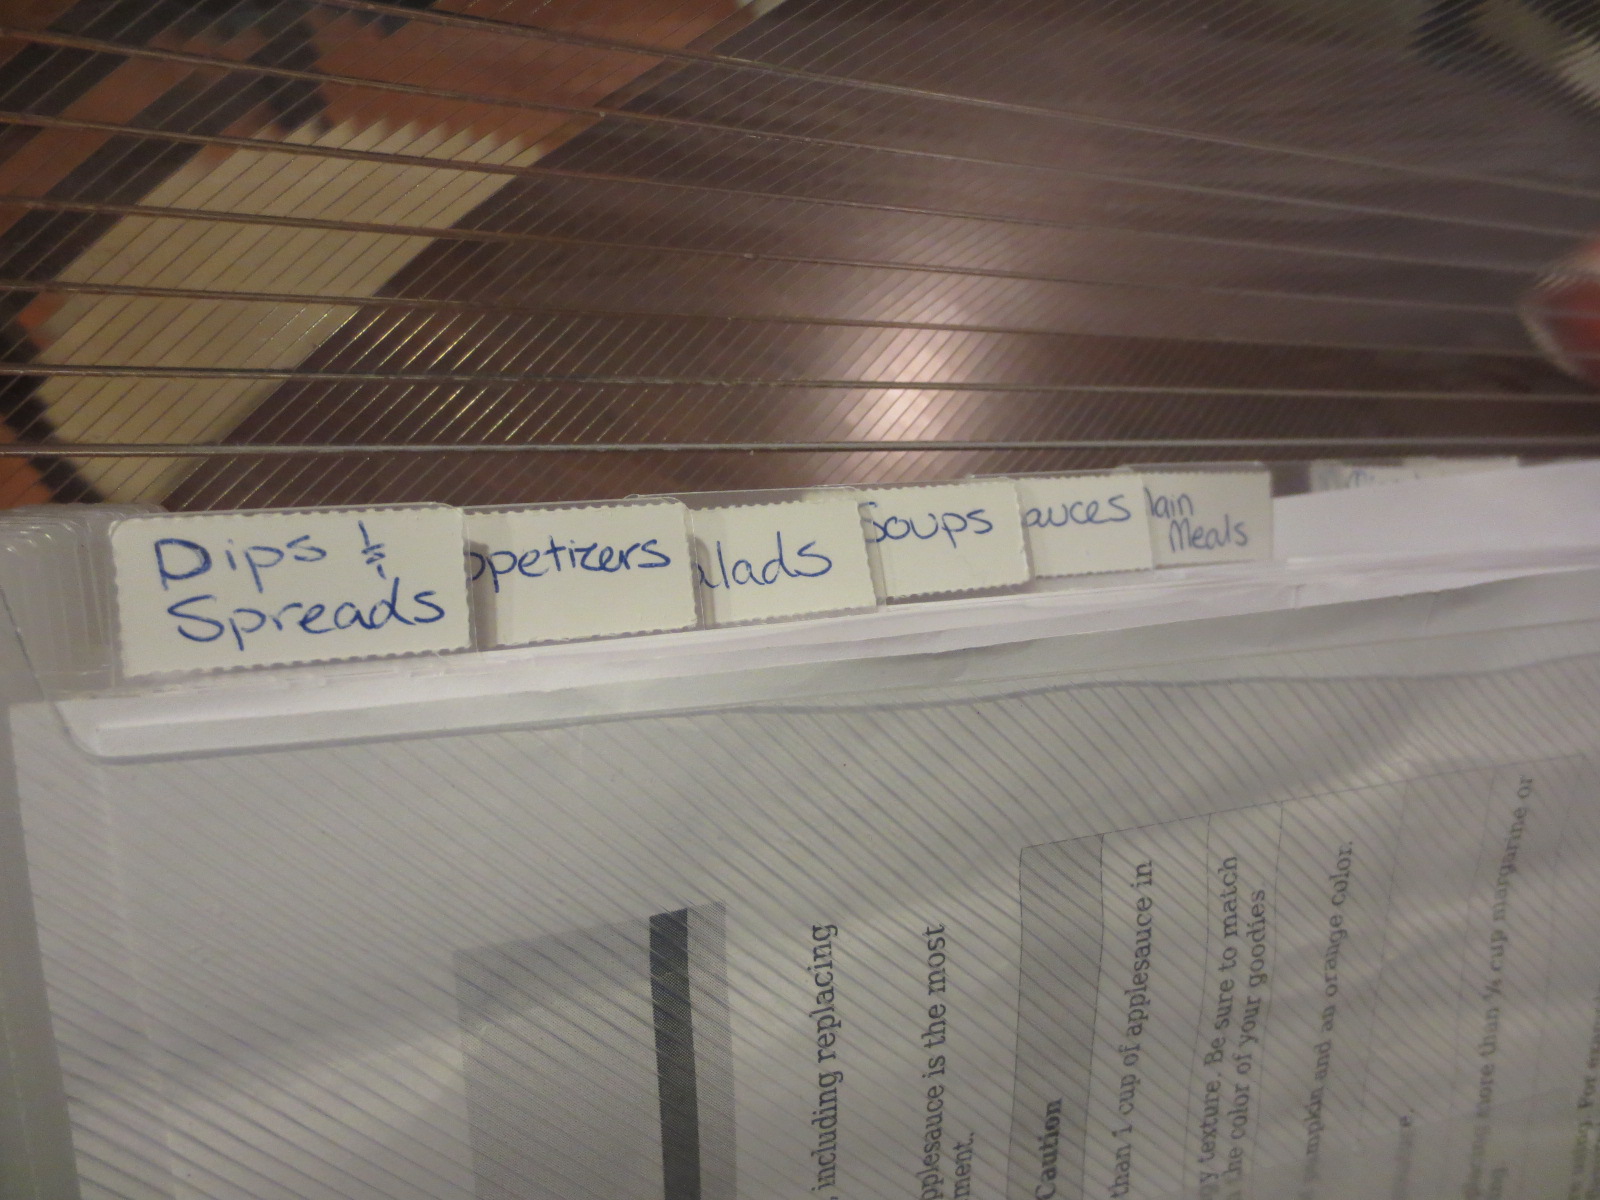
Before I started labeling the tabs, I thought I should sort my recipes in to different categories to see which ones I could combine and which ones needed there own tab. After sorting, and recycling the unwanted recipes, I decided on the following categories:

  • Dips & Spreads                               
  • Appetizers
  • Salads
  • Soups
  • Sauces
  • Main meals
  • Muffins & biscuits
  • Cookies
  • Desserts & squares 
  • Chocolate & dates 
  • Ice cream & novelties 


The folder is easy to store and it fits nicely on top of our fridge with my most used cookbooks, The Happy Herbivore Cookbooks of course. 

For now this is working great. It isn't the greenest option, but I don't go crazy with printing recipes. Maybe in the future I will think about getting a kindle or cloud reader. But for $4, I really can't go wrong with a familiar expandable file.

Tuesday 26 February 2013

Non-dairy milks and simple dishes


I love how many alternatives there are to milk in stores. Rice milk, almond, coconut, hemp, soy, oat, but with all of those choices, it can be a little overwhelming as to which non-dairy milk to stick with. Not that you have to stick with one, but I like to keep things simple and low cost. Most people recommend trying all the different kinds to find which one you like best. I have tried a few, but I have to admit, I'm really not very choosy and my choice is often driven by price.


Silk True Almond milk for me. I use it in oatmeal, cereal and for baking. 


Rice Dream for him, he likes the sweeter and lighter taste compared to almond milk.


Now for some cereal. Shredded Wheat, with and without bran. Sugar and salt free! So good with fruit and non-dairy milk. It also makes for a nice oatmeal topping. I should check out this "free" red scarf business....


I made sprouts! Chickpea sprouts, in my kitchen. It was easy thanks to Emily's Sprouting 101 post at The Daily Garnish. I've been sprinkling them on salads and munching on them for a quick snack. 


I also made some Amaranth. I haven't had it in a very long time, I really love the crunchy little beads of grain with a slightly nutty taste. I had some for breakfast topped with cinnamon, almond milk and banana. 


A plain salad can be so satisfying. Just two ingredients, so pretty. My salads look like this often, leafy green and a fruit. I try to eat two salads a day, always before a meal. I say this because I find salads taste best when I'm fairly hungry and I don't feel like eating a salad after a meal, I crave more of the meal I just ate...


Like this meal! On Sunday evening I made Happy Herbivore's Broccoli Pesto Pasta from the Happy Herbivore Cookbook. It was delicious! The fresh basil was lovely with the grape tomatoes and the broccoli added a nice heartiness to the dish. I will definitely be making this recipe again. 


Thursday 21 February 2013

Fat Free Vegan Samosas


I had been really craving samosas. But I wanted healthy, vegan samosas. Luckily my first attempt at a fat free version turned out pretty good. The dough is a bit chewy, but if you are used to fat free recipes it's no big deal. I adapted the recipe from Canadian Living: The Vegetarian Collection. I really enjoy this cookbook and have been able to adapt quite a few of the recipes to be made vegan and oil free.


Fat Free Vegan Samosas 
(recipe adapted from Canadian living cookbook) For original recipe and step by step photos, please click here.


Ingredients:
2 cups (500 mL) diced peeled potatoes
1/2 cup (125 mL) diced carrots
2 tbsp (50 mL) water 
1 tsp (5 mL) each fennel and cumin seeds
1 tsp (5 mL) brown or black mustard seeds
1/2 tsp (2 mL) ground turmeric and coriander and fenugreek seeds
1/4 tsp (1 mL) cayenne pepper
1 onion, chopped
2 cloves garlic, minced
1 tbsp (15 mL) grated gingerroot
1/2 tsp (2 mL) salt
1/2 cup (125 mL) frozen peas
3 tbsp (50 mL) lemon juice
2 tbsp (25 mL) chopped fresh coriander

Dough:
2 cups (500 mL) whole wheat flour *see note
1 tsp (5 mL) cumin seeds (preferably black)
1/2 tsp (2 mL) salt
1/2 cup (125 mL) each cold banana and milk
What to do:

Note: place unripe banana in fridge at least two hours prior to making dough. Using a slightly green banana is best. If a ripe is used the dough will taste like bananas. It is also important not to mash the banana prior to cutting in to flour, or pulsing in food processor. Cut in to small cubes just before adding. 


Making the dough: Using either a food processor or bowl with pastry cutter, combine flour, black cumin seeds and salt. Pulse or cut in cold banana until small beads begin to form. Then add in non-dairy milk and pulse or stir until dough forms in to a large ball. Shape in to disc, wrap tightly and place in fridge for 30 minutes or longer. 

Bring a large pot of water to a boil.  Add the potatoes and carrots and cook for about 10 minutes, until tender. Drain and set aside. 
While the potatoes and carrots are cooking, bring a large frying pan to medium heat, add water and begin to toast fennel, cumin and mustard seeds. Add in turmeric, coriander seeds, fenugreek seeds and cayenne and toast for about 1 minute. Next add onion, garlic, ginger and salt and saute until softened, around 3-5 minutes. Add a tbsp of water at anytime if sticking. Mix in potato, carrots and peas. Then lemon juice and coriander. Set aside and let cool. 
Remove dough from fridge and divide in to 12 pieces. Flour your surface and with a rolling pin, roll dough out in to a pancake shape. Cut the pancake shaped dough in half. Take one of the halves, dab a finger in water and run along cut edge to moisten. Make a cone shape by folding the cut edge in half and press to seal. Cup your hand to hold cone shaped dough comfortably. Fill cone with heaping tbsp of cooled potato mixture. Dab a finger in water again to moisten open inside edges and press to seal. Use a fork to crimp the pressed edges.
Line a cookie sheet with parchment paper and bake in 425°F (220°C) oven. I would preheat the oven around half way or 3/4 the way through hand making the samosas, as that step is quite time consuming. Bake for 15 - 18 minutes (flip after 8 -9 minutes). Serve warm with your favorite chutney or hot sauce.  

*Note: I used whole wheat flour for this recipe. Whole wheat pastry flour may yield better results, but I haven't tried it. 

Monday 18 February 2013

Organization makes it happen


Does this happen to you? You clean out a cupboard to reorganize. Upon returning with items for said cupboard, you realize you missed the opportunity and the space is now occupied? Empty spaces don't go unoccupied long around here...


In other not so news, I threw together a very simple salad on the weekend and it was surprisingly super tasty. At times I forget fresh herbs can really take a plate of food from meh to yum! That fresh herb was cilantro. It paired well with spinach, kale, red swiss chard, nutritional yeast and salsa.


I can whip up a salad like this in minutes since I make sure I keep my fridge stocked with washed leafy greens and veggies.


I did cheat and buy prewashed spinach, sometimes I like paying for a bit of convenience. I have noticed lunches have been really easy to throw together since starting this regimen. For our salads, we often use square Ziploc containers. I use the round ones of the left for spices and left over dried goods.


Since I usually top my salads with fruit and don't use any dressing, clean up is a breeze. After a salad I always finish my lunch with a grain or root vegetable, beans and more veggies. I bring this in a Pyrex dish, as seen below and remove the lid to heat.


Doing this small amount of prep on the weekend takes little time and effort. Being prepared ensures I have healthy meals and snacks, since I always have something to go home to or pack with me. Having practical storage containers keeps the process simple. You know those infomercials when the Tupperware is exploding out of the drawer or cupboard? Don't let that be you...Uh oh, I'm starting to sound like one. But for real, we find that sticking with a few container sizes and one or two brands keeps everything going smooth. No losing lids or the drawer jamming, or getting pancake mix in your hair (it could happen!). Now that I'm all organized, I guess I should take my lunch to work. 


Tuesday 12 February 2013

Weekend Noms


Hey Peeps! So nice to have a long weekend. First year for Family day in BC, woot! Throughout the weekend I did some fairly lazy nomming, even hitting up Pita Pit. Twice...They have $1 off coupons right now and their veggies are always fresh, I can't resist. With the extra day, I did make an effort to bake a cake. Not just any cake, a chocolate cake. A moist chocolate cake, with a mystery ingredient. See recipe, and mystery ingredient, below.

Lazy breakfast - shredded wheat with pineapple, bananas and pomegranate seeds:


Lazy salad - coleslaw, organic kale with pineapple and pomegranate seeds:


Now for the not so lazy chocolate cake. But as far as cakes go, this one is fairly simple. It is low in fat, vegan and accidentally gluten free. 


Moist Quinoa Chocolate Cake 
(Recipe adapted from ucook, courtesy of 365 Quinoa – The Everyday Superfood)


Ingredients 
  • 2/3 cup (150 mL) quinoa
  • 1 1/3 cup (325 mL) water
  • 1/3 cup (75 mL) almond milk, or other type of non-dairy milk
  • 4 tsp cornstarch + 12 tsp water
  • 1 tsp (5 mL) pure vanilla extract
  • 3/4 cup (175 mL) applesauce
  • 3/4 (375 mL) brown sugar
  • 1 cup (250 mL) unsweetened cocoa powder
  • 1 ½ tsp (7.5 mL) baking powder
  • ½ tsp (2.5 mL) baking soda
  • ½ tsp (2.5 mL) salt

What to do


1. Bring quinoa and water to a boil in a medium saucepan. Cover, reduce to a simmer and cook for 10 minutes.Turn off the heat and leave the covered saucepan on the burner for another 10 minutes. Fluff with a fork and allow the quinoa to cool.

2. Preheat oven to 350°F (180°C). Lightly grease two 8 inch (20 cm) round or square cake pans. Line the bottoms with parchment paper.

3. In a small dish, combine the cornstarch and water and set aside.

4. Combine the non-dairy milk,cornstarch mixture and vanilla in a blender or food processor. Add 2 cups (500 mL) of cooked quinoa and apple sauce and blend until smooth.

5. Whisk together sugar, cocoa, baking powder, baking soda and salt in a medium bowl. Add the quinoa mixture from the blender and mix well.

6. Divide the batter evenly between the 2 pans and bake on the centre oven rack for 40 to 45 minutes or until a knife inserted in the centre comes out clean.

7. Cool on wire rack before serving. (careful not to break apart when flipping cake over). Top with frozen fruit, melted chocolate, icing or eat as is. 


Note: I plan to try this recipe with mashed bananas or flax or chia eggs instead of the cornstarch and water mixture. I will report back on the tastings ;)


Friday 8 February 2013

Polenta, served two ways


Hello! Please check out my about me page if you haven't already.

I don't often meal plan. Most of the time, I just make sure I have wholesome foods in the fridge, readily adaptable for different types of meals. When my husband asked me the other night "what should we do for dinner?", I realized I didn't have much for starches in the fridge. Luckily we were at Langley Farm Market when he asked, and I happened to be looking at ready made Polenta. We decided to do a pizza for him and individual sliced polenta with toppings, for me.

We baked the polenta first, according to the package directions (without oil), on parchment. Then he made his pizza, topped with sauce, sundried tomatoes and black beans. Baking it as per the pizza crusts instructions. I kept it simple and topped my polenta slices with homemade pizza sauce (strained tomatoes, italian seasoning, garlic and onion powder) and black beans, served on a bed of spinach.

His pizza (lacking in colorful veggies, boo!):


Polenta slices:


Although we discovered the polenta needed more seasoning, it didn't stop me from having seconds, I really like this idea for a different and quick meal. Next time I'm thinking of dusting the slices with smoked paprika, cumin, chili powder, onion powder and garlic powder prior to baking.

Looking forward to trying out more recipes with polenta in the future.